
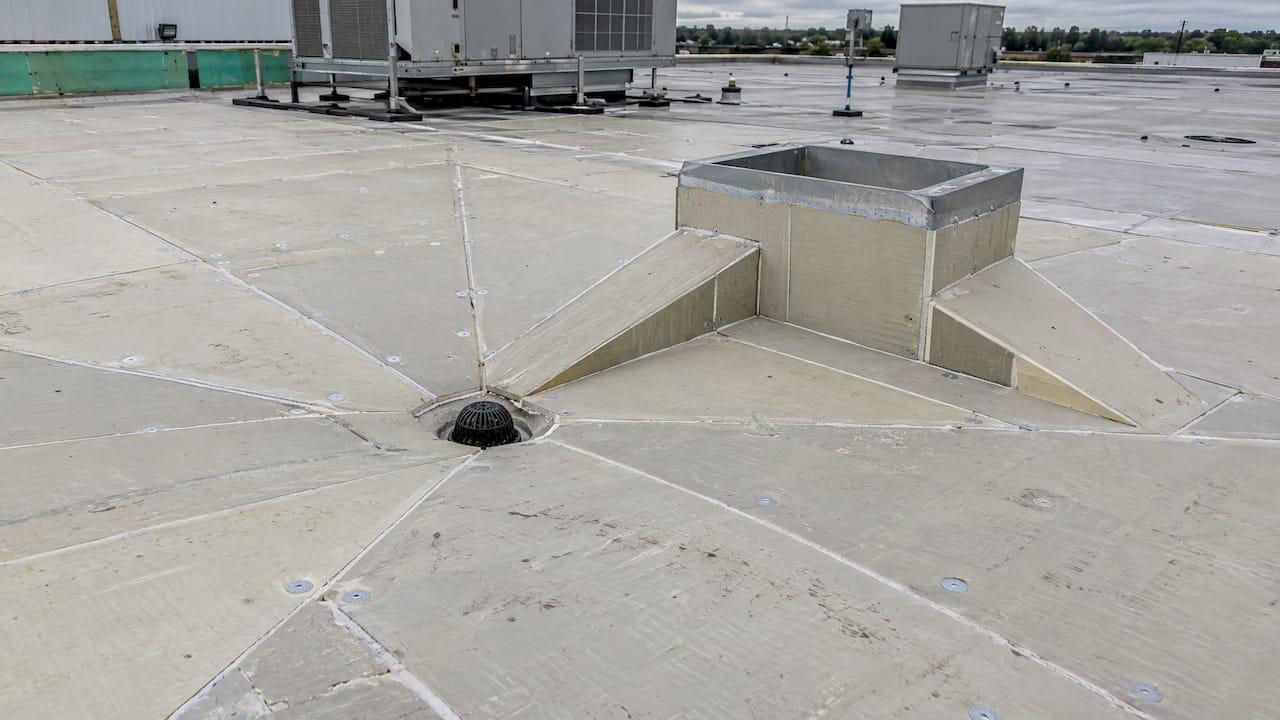
A tapered insulation takeoff is not an area times a thickness. You split the roof into drainage zones, record the slope and the start and end thickness of each zone, price crickets and saddles on their own lines, and keep flat insulation separate. Do that on every bid and your number matches what the distributor quotes and what the crew installs. Our PDF takeoff tools let you measure each zone's area and count on the plan, so every quantity traces back to a drawing you can open again.
TL;DR
- Tapered insulation is priced by volume (board feet) and laid out by zone. Flat boards are priced by area and thickness.
- Get the drainage plan first: drain locations, slope direction, net slope, minimum thickness and any maximum thickness.
- Keep four lines apart: flat insulation, tapered field zones, crickets and saddles, and cover or base layers.
- Show net, waste and order quantities as three separate lines so waste is applied once.
- The distributor's or manufacturer's layout is the final order document. Your takeoff has to be close enough to catch a bad quote.
Table of Contents
- What makes a tapered takeoff different from flat insulation
- Step 1: Gather what the layout depends on
- Step 2: Break the roof into zones
- Step 3: Measure each zone's area, run and thickness
- Step 4: Convert to board feet
- Step 5: Take off crickets, saddles and sumps separately
- Step 6: Handle waste and rounding the right way
- Step 7: Reconcile with the distributor's layout
- A zone log you can reuse
- Where takeoffs go wrong
- Our perspective
- Put the zone log to work
- FAQ
- Sources
What makes a tapered takeoff different from flat insulation
Flat insulation is simple. You measure the roof area, pick the board thickness and count sheets. Tapered insulation builds slope into a flat deck so water runs to the drains. The thickness changes across the roof, so area alone tells you almost nothing about material.
The code reason is ponding. Owens Corning's tapered product data sheet states that the IBC requires a minimum slope of 1/4 inch per foot to roof drains, scuppers or gutters. A flat structural deck rarely gives you that, so the insulation does the work. That is why a roofing sub's tapered scope can be one of the biggest material lines on a low-slope bid.
Two terms you will see on every set:
- Cricket (or saddle): a small tapered piece that diverts water around a curb, penetration or between drains.
- Net slope: the slope the water actually sees once you account for the slope already in the deck.
The Strategic Building Products tapered guide gives a clean example: a deck sloped 1/2 inch per foot with 3/4 inch per foot counter-slope material gives 1/4 inch per foot of net positive slope. If your takeoff mixes up material slope and net slope, you will price the wrong panel.
Step 1: Gather what the layout depends on
Before you measure anything, pull the documents that define the drainage. For a roofing sub that means the roof plans, roof sections and details, the mechanical and plumbing sheets (they place drains, curbs and units), and the spec section for insulation and roofing.
Then collect the inputs a layout needs. A distributor's quote request is a good checklist, because it is what they need to give you a number. ABC Supply's tapered quote procedures ask for:
- the material type (ISO, EPS, XPS or perlite)
- the direction of slope and the desired pitch (1/16, 1/8, 1/4, 3/8 or 1/2 inch per foot)
- the cricket or saddle pitch, typically twice the field slope
- the existing deck slope, for cricket-only estimates
- the minimum starting thickness, not counting base or overlay layers
- any maximum overall thickness
- to-scale or dimensioned roof plans
- whether the R-value requirement is a minimum (lowest point) or an average (overall thickness)
That last item changes the quantity. A minimum-R spec forces the thin end up to the required thickness. An average-R spec lets the thin end go lower. Read the spec language before you pick a starting thickness.
The Performance Roofing Associates tapered design guide says the key to a good design is analyzing field conditions: dimensions, drain locations and deck slope, checked for ponding or deflection. It also says the drainage plan criteria matter before the bid, not after.
Field conditions drive this more than most estimators expect. Roof hatches, curbs and equipment pads all sit in the way of water, and a layout has to route around them. A roof hatch guide shows the kinds of roof-level openings and access points you should locate on the plan before you draw crickets.

Step 2: Break the roof into zones
Divide the roof by assembly first. Each roof area gets an assembly label (for example R1, R2) so you never mix a tapered area with a flat one in the same line. Then divide the tapered areas by drainage zone.
The PRA guide catalogs the common layout types: one-, two-, three- and four-directional slopes, crickets, snub-nose and diamond crickets, and backwash or counter-slope layouts. Match each zone to one of those types. The type tells you where the ridge lines go. Per the Strategic guide, the ridge normally sits halfway between two low points but can be offset when slope combinations are used.
Two rules keep the zones clean:
- If the spec lists several board types or slopes, keep each separate, even if they cover the same roof plane.
- Mark the plan the way a designer would. Use unique arrows or shading and a legend for tapered areas, crickets, counter-slope and structurally sloped insulation. The Strategic guide asks for this on drawings, and it makes your own markup readable by the next person.
If the drawings do not show tapered zones, do not guess a drainage plan in silence. Put the assumption in your bid clarifications, and ask the GC whether the design team or the manufacturer will provide the layout.
Step 3: Measure each zone's area, run and thickness
For each zone you need four numbers:
- Area in square feet
- Run from the ridge to the low point in feet
- Slope in inches per foot
- Start thickness and the resulting end thickness
End thickness is start thickness plus slope times run. For a 1/8 inch per foot slope over a 20 foot run, the rise is 2.5 inches.
The Strategic guide uses 0.5 inch as the minimum tapered polyiso thickness when average R-value and code are not issues. If R-value does matter, your start thickness moves up. Do not use 0 as a start thickness on a polyiso zone unless the layout actually specifies a feathered edge.
This is the area measurement your PDF takeoff does every day. Our area takeoff from a PDF method covers how to set scale, trace zones and keep the result auditable. Our roofing takeoff from PDF guide shows the same workflow for a full roof. Crickets and saddles are counts, and the count takeoff method keeps those from getting missed.
Step 4: Convert to board feet
Taper systems are priced by volume, usually board feet. One board foot is one square foot of board one inch thick. C3 Group's 2020 paper on estimating taper systems explains that a contractor sends roof drawings with drain and curb locations to a local distributor and gets a proposal with multiple options, then adds labor and ancillary materials such as fasteners and adhesives. For a 0 to 4 inch taper, it deducts 50% of the full-thickness 4 inch board component to approximate the average volume.
The average-thickness method is the same idea. For a straight-sloped zone, board feet equal area times the average of the start and end thickness.
Worked example: one zone
A 20 foot by 40 foot zone slopes in one direction at 1/8 inch per foot over its 20 foot run, starting at 1 inch.
- Area: 20 × 40 = 800 SF
- End thickness: 1 + (0.125 × 20) = 3.5 inches
- Average thickness: (1 + 3.5) ÷ 2 = 2.25 inches
- Volume: 800 × 2.25 = 1,800 board feet
Check it against panels. Tapered panels commonly come in 24 by 96 inch pieces, which is 16 SF each. The JM tapered chart lists its 1/8 inch per foot panel A at 1 to 1.5 inches with an LTTR of 7.1, 38 pieces per unit and 608 SF per unit. That is 16 SF per piece. So 800 SF is 50 panels, and the real layout will use a mix of panel designations stepping up the slope. A taper package is not 50 identical boards. That is why the distributor's layout matters for the order, and why your volume math protects your price.
The C3 paper's own test case shows the same math at small scale: a 16 by 16 foot roof, 2.56 SQ, tapering from 0 to 4 inches at 1/4 inch per 12 inches (2%). The average thickness there is 2 inches.
Pallet coverage
Pallet and unit coverage depends on the panel. Owens Corning's data sheet lists its 1/8 inch slope A panels (0.5 to 0.75 inch, 24 by 96 inch) at 4,608 SF per pallet, and its 1/4 inch slope E panels (0.5 to 1 inch) at 3,840 SF per pallet. Different slopes, different counts. Never use one coverage number across a whole bid.
Step 5: Take off crickets, saddles and sumps separately
Crickets are where takeoffs go wrong. They are small, irregular and easy to skip, and they use a steeper slope than the field. PRA's guide says cricket material slope should exceed the roof surface slope. Its example is a 3/4 inch per foot cricket on a 1/2 inch per foot roof, which yields a 1/4 inch per foot net positive slope. It also says that if the structure slopes 1/4 inch per foot, you specify 1/2 inch per foot crickets.
For each cricket, record:
- location (which curb, unit or drain it serves)
- footprint and shape (saddle, diamond, snub-nose)
- slope and peak thickness
- count
Also record sumps and edge strips where the layout calls for them, each as its own line. Where the geometry is irregular, volume comes from the layout, not from your own shortcut. Rules of thumb that circulate, like budgeting extra volume over flat insulation, are fine for a budget number. They are not a bid number once a layout exists.
PRA also advises placing drains as close as possible to the lowest point and avoiding curbs or penetrations in drain valleys or low points. If the plans show the opposite, that is an RFI. A curb sitting in a valley makes the cricket layout harder and may change your quantity. Ask early. Our HVAC duct takeoff guide is a good reminder of how mechanical equipment placement ripples into other trades' scope.

Step 6: Handle waste and rounding the right way
Waste is where a clean takeoff gets muddied. Keep three lines visible for each material:
| Line | What it holds |
|---|---|
| Net quantity | Exactly what the drawings need, by zone |
| Waste | Cut loss at edges, drains, curbs and penetrations, applied once |
| Order quantity | Net plus waste, rounded up to whole panels or units |
Three habits keep you out of trouble:
- Do not apply a flat waste percentage to the whole roof. Flat insulation, tapered zones and crickets cut differently. Tapered layouts are designed to a drawing, so the pieces are cut to fit the plan. Ask the distributor what waste it has built into its layout before you add your own.
- Round at the order line, not the zone line. Rounding up every zone separately overstates the order. Round the total panels by designation once.
- Keep the base layer, cover board and tapered layers separate. The minimum starting thickness in a quote request excludes base and overlay layers, so they are their own lines.
The same discipline applies to other insulation scopes. Read the assemblies first, code each one, measure by assembly, and mark up the plan so every quantity traces to a sheet and detail. That keeps a double count from sneaking in when the same roof plane carries two layers.
Step 7: Reconcile with the distributor's layout
Your takeoff is the number you bid. The layout from the supplier is the number you buy. Both should land close.
Send the supplier your roof plans with drain and curb locations, and the inputs from Step 1. Owens Corning notes that it provides tapered estimating services with detailed tapered layouts describing quantities and installation sequence. Distributors do the same for their lines.
When the quote comes back, compare it to your zone log:
- Is the total volume within a reasonable range of your board feet?
- Does the quote cover every zone, cricket and sump you listed?
- Is the net slope what the spec wants?
- Are base, cover board and fasteners on separate lines from the taper?
If the volume is far off, you usually mis-set a start thickness, missed a cricket or read material slope as net slope. Find it before bid day, not after the purchase order.
A zone log you can reuse
| Zone | Assembly | Area (SF) | Slope (in/ft) | Start (in) | End (in) | Board feet | Notes |
|---|---|---|---|---|---|---|---|
| R1-A | Polyiso taper | 800 | 1/8 | 1.0 | 3.5 | 1,800 | One direction to drain D1 |
| R1-B | Polyiso taper | Per plan | 1/8 | 1.0 | Per plan | Per plan | Two-direction ridge |
| R1-C1 | Cricket | Per plan | 1/4 | 0.5 | Per plan | Per plan | Behind RTU curb |
| R1-F | Flat ISO | Per plan | n/a | 2.0 | 2.0 | Area × 2 | Base layer, separate line |
A log like this is what a reviewer reads. They can see the logic without opening your workbook, and you can reuse it on the next roof.
Where takeoffs go wrong
A few repeat offenders on tapered bids:
- Using the spec's minimum slope as the design slope. The code minimum is a floor. The drawings set the slope.
- Ignoring the deck. If the deck already slopes, the taper changes. Confirm net versus material slope.
- Starting at zero. Polyiso zones need a real minimum thickness.
- Missing crickets behind mechanical curbs. Pull the mechanical sheets and count every curb.
- Applying waste twice. Once in the zone and again in the order.
- Skipping the R-value rule. Minimum versus average R-value changes the thin end.
Our perspective
Tapered insulation is where a good estimator earns the margin. The material is expensive, the layout is detailed, and a wrong start thickness shows up in thousands of board feet.
We built Subascent for specialty trade subs, not for general contractors, so the takeoff sits next to the bid, the submittals and the job. Measure the zones on the PDF, keep the quantities tied to the sheet, and the estimate you send is one you can defend when the GC asks why your number differs from the next roofer's.
A roofing sub does not need a tool built around a GC's project. It needs the roof plan, the zone log and the bid in one place.
Dave
Put the zone log to work
If you are measuring roof zones by hand or rebuilding a workbook for every bid, our PDF takeoff tools are built for that job: areas, linear feet and counts taken from the plan. Takeoff is a paid add-on at $99 per month. Plans start with Starter at $49 per month, Scale at $99 per month and Pro at $179 per month, and annual billing is available. See the plans and details on the Subascent site, or look at how estimating and takeoff fits with bid tracking, submittals and job costs.

FAQ
How do you calculate tapered insulation?
Measure each drainage zone's area, then find the average thickness from the start thickness and the slope times the run. Multiply area by average thickness for board feet. Price crickets and saddles on their own lines, then confirm the result against the supplier's layout.
What is the minimum slope for tapered insulation?
Owens Corning's data sheet says the IBC requires 1/4 inch per foot to roof drains, scuppers or gutters to prevent ponding. Manufacturers also offer lower pitches such as 1/8 inch per foot as tapered panels. Read the project spec and local code for the slope the design requires.
What does a tapered insulation layout need to show?
It should show the drains, the direction of slope, the net slope, the minimum thickness and any maximum thickness. It should also mark crickets, saddles and any structurally sloped insulation with arrows or shading and a legend. Distributors ask for these same inputs before quoting.
How do you handle waste on a tapered takeoff?
Keep net quantity, waste and order quantity as three separate lines. Apply waste once, after the net count, and round up to whole panels at the order line. Ask the distributor what waste its layout already includes.
Sources
- Owens Corning FOAMULAR tapered product data sheet
- Strategic Building Products Tapered Systems Guide
- ABC Supply request for tapered quote procedures
- Performance Roofing Associates Tapered Design Guide
- C3 Group: Estimating Taper Systems
- JM Tapered Polyiso Insulation chart
- Commercial roof hatch guide