

Yes, QuickBooks handles job costing well once it's set up correctly: enable Projects in QuickBooks Online (or Customer:Job in Desktop), tag every bill, invoice, and timesheet to the right job, and enter an estimate before work starts. Skip any one of those three, and your Job Profitability and Estimates vs. Actuals reports will lie to you. The fix isn't complicated, but it does require discipline from everyone touching the books, not just your accountant.
TL;DR:
- Proper job costing requires consistent tagging of every expense, bill, and timesheet to avoid inaccurate profitability reports.
- Setting up detailed item lists with specific cost codes and choosing appropriate accounting for WIP or COGS ensures accurate cost tracking.
- Regular reconciliation of estimates versus actual costs and monitoring key reports weekly helps catch overruns before they turn into losses.
- Using cost groups and project phases simplifies report reading when item counts grow large and helps identify specific stages that exceed budget.
- Accurate overhead allocation and consistent flagging of billable expenses protect margins, while proper synchronization of field hours prevents data mismatches.
Table of Contents
- How Do You Set Up Job Costing in QuickBooks?
- Where Do Costs Actually Belong?
- Why Estimates Are the Backbone of Job Costing
- Which Job Costing Reports Should You Actually Run?
- Should You Use Cost Groups and Project Phases?
- What Mistakes Wreck Job Cost Reports, and How Do You Fix Them?
- How Do You Allocate Overhead and Indirect Costs?
- How Should You Separate Billable and Non-Billable Costs?
- How Do You Customize Job Costing Reports for Your Business?
- How Do You Fix Discrepancies Between Job Reports and Financial Statements?
- How Do You Sync Time Tracking and Payroll With QuickBooks?
- What I Learned Fixing a Bad Estimate
- Where Subascent Fits Alongside QuickBooks
- Where to Verify These Setup Steps
- Sources
How Do You Set Up Job Costing in QuickBooks?
QuickBooks Online and QuickBooks Desktop handle job tracking differently, but the underlying logic is the same: every dollar in and out needs a job attached to it, or your reports are just guesses with decimal points.
In QuickBooks Online, turn on job tracking under Settings > Account and Settings > Advanced > Projects. Once enabled, you build a Project for each job and link every transaction, estimate, and time entry to it. In QuickBooks Desktop, there's no separate "Projects" toggle. Instead, you set up a Customer:Job for each job under the Customer Center, assigning expenses, time, and items to that Customer:Job so job costing reports pull accurate numbers.
Here's the setup order that actually works for a specialty trade sub:
- Turn on Projects (QBO) or create Customer:Job records (Desktop) using a naming convention that includes the job number and GC name, like "24-118 Meridian Electric / ABC Construction."
- Build out your Item list with real cost-code granularity. Generic items like "Labor" and "Materials" won't cut it. Break labor into rough-in, trim, and service; break materials into wire, panels, fixtures, or whatever matches your trade.
- Decide your Item mapping: WIP or COGS. Long-duration jobs with progress billing usually map to Work-in-Process accounts. Short-turn service work usually posts straight to COGS. This decision should match how you invoice and recognize revenue.
- Turn on time tracking and connect QuickBooks Time or your payroll provider so field hours land against the right job automatically.
- Set permissions. Only office admins should have Spreadsheet Sync access in QuickBooks Online Advanced, and every user entering bills or time should be required to select a job or Customer:Job before saving.
None of this is glamorous work, but it's the difference between reports you can trust and reports you have to double-check by hand every month.
Where Do Costs Actually Belong?
Every cost has one correct home, and putting it anywhere else quietly corrupts your job profitability numbers. Bills, credit card charges, and purchase order receipts should always get tagged to the Project or Customer:Job at entry, not weeks later during reconciliation.
Subcontractor invoices deserve extra care. Mark reimbursable expenses as billable if you're passing them through to the GC, and if you're holding retainage, track it in a separate liability account so it doesn't distort your gross margin until it's actually released.
Equipment costing splits into two paths. Rented equipment is straightforward: code it to the job as a direct cost the day it's billed. Owned equipment is trickier. Most trades allocate an hourly or daily internal rate to the job based on usage, similar to how you'd cost out a crew member's time. Material costs often run 50% to 70% of a job's total cost, according to QuickBooks' own job costing research; sloppy material tagging alone can sink an otherwise-accurate report.
Labor is where most subs lose the thread. Foremen tracking hours on paper or in their heads means timecards get backfilled days later, often misassigned to the wrong job entirely.
- Route all field time through a digital timesheet tied to job codes, not a paper log
- Post payroll to jobs through your payroll integration rather than a manual journal entry
- Separate posting timesheets (drive job cost) from non-posting ones used only for payroll compliance
- Reconcile crew hours against the schedule weekly, not at month end
Pro Tip: Have foremen submit time daily through a mobile app instead of Friday morning. A week-old memory of "which job was that concrete pour on Tuesday" is not a cost record.
Why Estimates Are the Backbone of Job Costing
An estimate isn't paperwork you file and forget. It's the baseline every job costing report measures against, and without one, several reports either exclude the job entirely or show numbers that don't mean anything. QuickBooks' reporting structure expects an estimate as the budget line, so a job with no estimate can show a WIP Summary with negative remaining cost or simply drop off the report.
Build your estimate the same way you'd build a real bid: separate line items for materials, subcontracted work, labor, equipment, and markup. Here's the sequence that keeps estimates useful all the way through the job:
- Enter the estimate in QuickBooks before the first invoice or bill posts to the job, using the same cost codes you'll use for actuals.
- Update the estimate when change orders are approved, not after the job closes, so Estimates vs. Actuals stays meaningful in real time.
- Review variance weekly, not at job close, so a cost code running 20% over shows up while there's still time to act.
- Act on the signal, whether that means chasing an unbilled change order, adjusting the schedule of values on your next progress invoice, or flagging the foreman about pace on a specific phase.
Jobs with no estimate on file are almost always the ones where owners get surprised at closeout. The estimate is what turns "we think we made money" into "we know exactly where we made or lost it."
Which Job Costing Reports Should You Actually Run?
QuickBooks gives you more reports than you need, but five of them do almost all the work: Job Profitability, Job Estimates vs Actuals, Job WIP Summary, Committed Costs by Job, and Time by Job. Knowing what each one answers matters more than running all of them constantly.
- Job Profitability Summary shows total revenue minus total cost per job at a glance; run the Detail version when a job's margin looks off and you need to know which cost code is dragging it down.
- Job Estimates vs. Actuals compares your bid line items to real spend, cost code by cost code, so you can see exactly where a job is running hot before it closes.
- Job WIP Summary shows percent complete, earned revenue, and whether you're over-billed or under-billed relative to the work done, which matters most on longer jobs with progress billing.
- Committed Costs by Job lists open purchase orders and subcontracts not yet billed, giving you a preview of costs still coming.
- Time by Job and Unbilled Costs round out a quick weekly scan: are hours landing where they should, and is there billable work sitting unbilled?
A practical rhythm: scan Job Profitability for jobs with a big negative variance, open Estimates vs. Actuals to isolate the problem cost code, then check Committed Costs to see what's still coming down the pipe. That three-report loop, repeated weekly, catches small overruns before they compound into a job that loses money you don't notice until it's closed. For a deeper breakdown of how the margin math works, see how job profitability works for trade contractors.
Should You Use Cost Groups and Project Phases?
If your Item list has grown to 80 or 100 line items, reading a job cost report becomes an exercise in squinting. Cost groups solve that by rolling detailed items into five broad buckets: Labor, Materials, Equipment, Subcontractor, and Miscellaneous.
QuickBooks Online Advanced with the Construction Add-on lets you categorize spending into these groups and view budgets and reports at that rolled-up level, while still keeping item-level detail available underneath for root-cause digging. Pair cost groups with project phases (foundation, framing, finishing) and you can see, for example, that your Labor group ran fine overall but blew the budget specifically during the finishing phase.
- Assign every Item to one of the five default cost groups when you build out your list
- Use phases to segment a single job into stages that reflect how your trade actually sequences work
- Run the group-level report first for a fast scan, then drop into item detail only where a group looks off
Spreadsheet Sync, available to QBO Advanced admins, lets your office manager push bulk updates from Excel directly into QuickBooks. Access is admin-controlled, and posting errors are common when dropdown values, date formats, or decimal entries don't match QuickBooks' validation rules. Validate the data before you sync, every time.
What Mistakes Wreck Job Cost Reports, and How Do You Fix Them?
Most job costing problems trace back to the same handful of habits, and inconsistent tagging tops the list more often than any software limitation.
- Require job tagging on every transaction type, no exceptions, and make it a condition of bill approval, not an afterthought.
- Standardize item names across all jobs so "PVC Pipe" isn't also "pvc pipe" and "PVC" in three different jobs.
- Close stale estimates once a job wraps so they stop skewing open-job reports.
- Force timesheet tagging at entry, not during payroll processing when memory has already faded.
- Reconcile WIP monthly against your financial statements, not just at year end.
Pro Tip: Run a monthly report filtered for untagged transactions before you close the books. Five minutes of scanning catches the miscoded expense that would otherwise throw off next quarter's margin comparison.
Weekly, check gross margin by job and committed versus actual costs. Monthly, check labor hours per unit produced and reconcile WIP. Trades that skip this rhythm tend to find out a job lost money the same day they invoice the final draw, which is the worst possible time to learn it. Electrical subs in particular run into a specific set of job costing mistakes worth reviewing directly.
How Do You Allocate Overhead and Indirect Costs?
Overhead, your office rent, insurance, admin salaries, and software subscriptions, doesn't belong to any single job, but ignoring it entirely means your job profitability numbers look better than your actual bank balance.
The most common approach among trade subs is a percentage markup applied to direct costs or direct labor. If your annual overhead runs $180,000 and your annual direct labor cost runs $900,000, you'd apply a 20% overhead rate to each job's labor cost as a non-posting or memo line in QuickBooks. That way, job profitability reports reflect a more honest picture without forcing overhead through a bill-by-bill allocation you'll never keep up with.
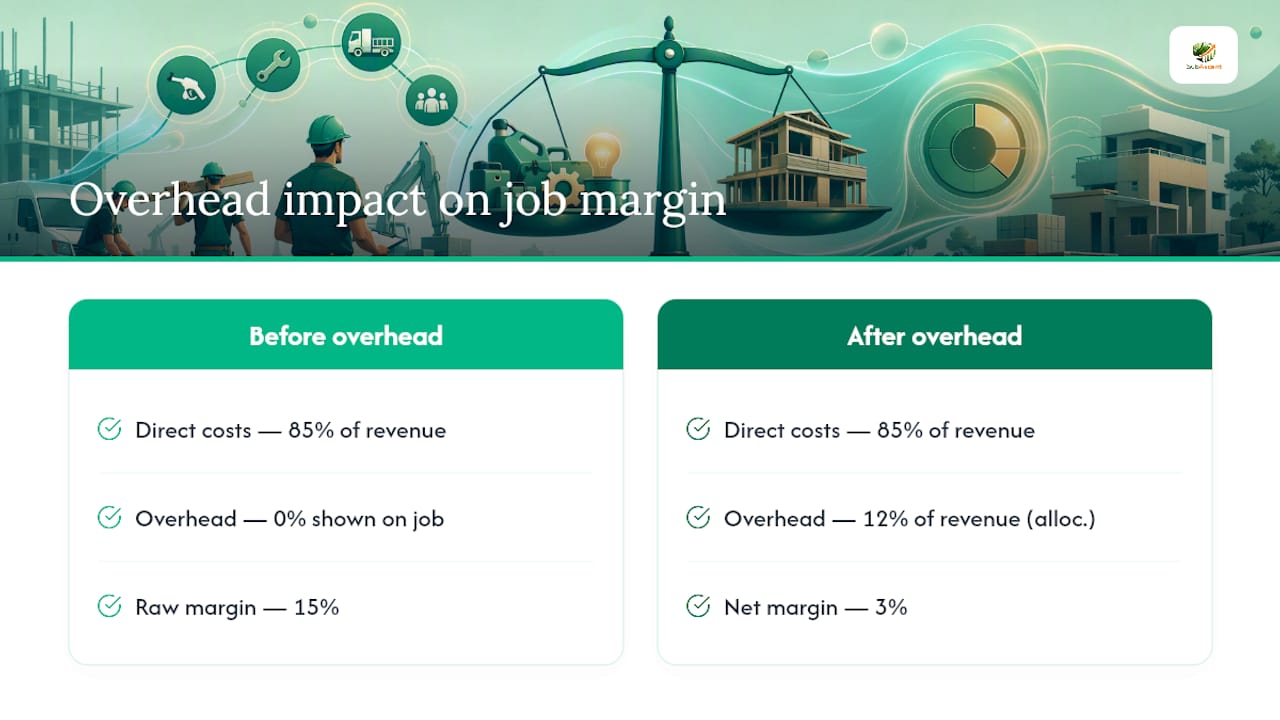
Some trades prefer allocating overhead as a percentage of total job revenue instead of labor cost, which tends to fit better for material-heavy trades like plumbing or masonry where labor isn't the dominant cost driver. Either method works. What matters is picking one and applying it consistently across every job, so margin comparisons between jobs stay apples to apples.
Keep the overhead allocation separate from your direct job costs in reporting, ideally as its own line so you can see both the raw job margin (before overhead) and the true net margin (after overhead) side by side. A job that looks like it cleared 15% before overhead but only 3% after is a job you want to price differently next time you bid similar work.
How Should You Separate Billable and Non-Billable Costs?
Billable costs get passed through to the customer or GC. Non-billable costs come out of your own margin. Mixing them up in QuickBooks is one of the fastest ways to either underbill a client or overstate how much a job actually cost you.
When entering a bill or expense, mark it billable at the point of entry, not later. QuickBooks lets you flag an expense as billable and tie it to a specific customer or job, which then makes it available to pull directly onto an invoice. If you wait until invoicing to sort out which costs were reimbursable, you'll miss some, and missed billable costs are money left on the table permanently.
Set a clear internal rule for what counts as non-billable by default: warranty callbacks, rework caused by your own crew's error, or overhead-adjacent costs like a truck repair that isn't job-specific. Trades that skip this step often end up eating costs they were entitled to bill, simply because nobody flagged them at entry.
- Mark expenses billable at entry, tied to the correct customer or job
- Build a short internal reference list of what's always non-billable (rework, warranty work, internal training time)
- Review the "unbilled costs" filter weekly so billable expenses don't get stranded past the next invoice cycle
- Train PMs to check billable status before approving a bill, not after
Getting this right protects your margin on every job, not just the big ones. A missed $400 billable delivery charge doesn't sound like much until it happens on every job, every month, for a year.
How Do You Customize Job Costing Reports for Your Business?
QuickBooks' default reports are a starting point, not a finished product. Every trade has different cost structures, and the report that works for a plumbing outfit tracking service calls looks different from one built for a masonry contractor running six-month commercial jobs.
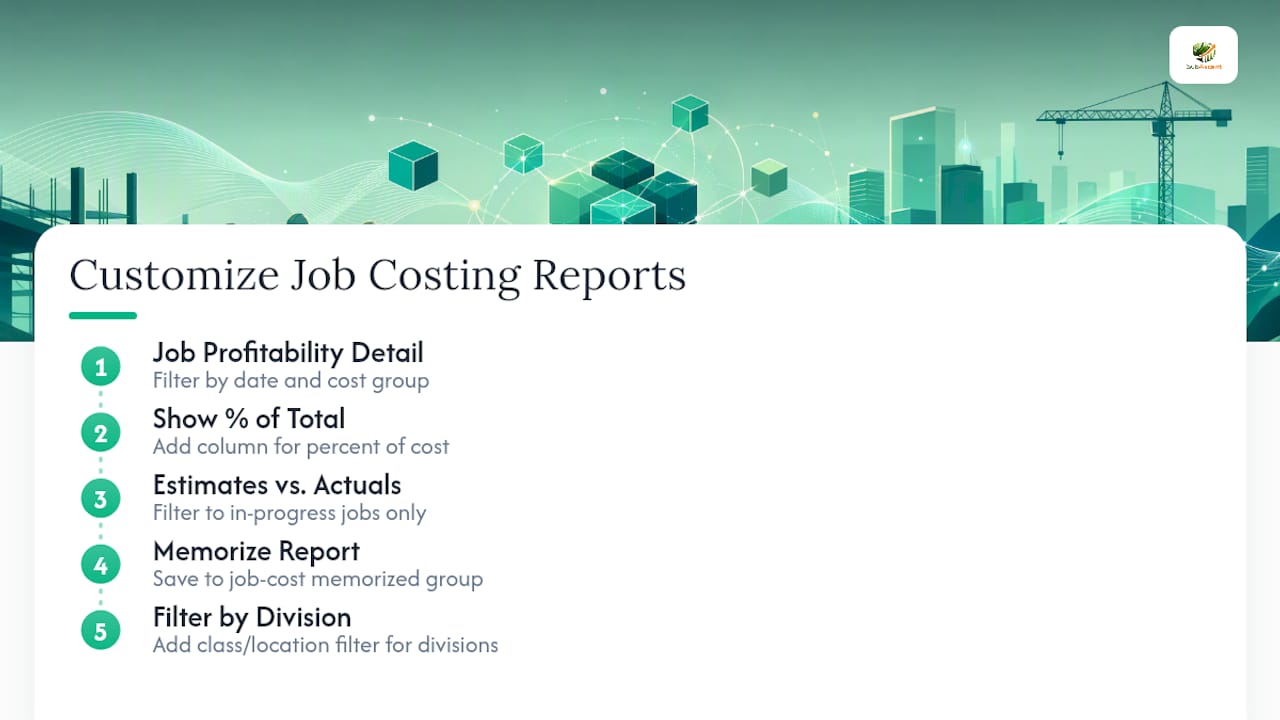
Start by customizing the Job Profitability Detail report to filter by date range and by cost group instead of scrolling through every line item on a long job. Under the report's customize panel, you can add columns for percent of total cost, which turns a wall of dollar figures into something you can actually scan for outliers.
For Estimates vs. Actuals, filter to show only jobs currently in progress rather than every job you've ever run. A report cluttered with closed jobs from two years ago just slows down the weekly review you're trying to build a habit around.
Save your customized report as a memorized report in QuickBooks so you (or whoever's running the weekly review) aren't rebuilding filters every time. Set a memorized report group specifically for job costing, separate from your standard financial statement package, since the audiences and the cadence for each are different: financial statements monthly, job cost reports weekly.
If you manage multiple trades or divisions under one QuickBooks file, add a class or location filter on top of the job filter so you can see profitability by division as well as by individual job. This extra layer takes ten minutes to set up once and saves real time every week after.
How Do You Fix Discrepancies Between Job Reports and Financial Statements?
When your Job Profitability report says you made money but your P&L says otherwise, the mismatch almost always comes down to timing or mapping, not fraud or a QuickBooks bug.
The first place to check is your Item mapping. If some items post to Work-in-Process while others post straight to COGS, a job in progress will show different totals depending on which report you're looking at until the job closes and WIP rolls into COGS. Matching your Item mapping to how you actually invoice and recognize revenue prevents most of this confusion before it starts.
The second common culprit is timing. A bill entered in March for February's material delivery shows up in a different accounting period than the job cost report expects, throwing off month-over-month comparisons even when the total is eventually correct.
Run a reconciliation checklist monthly: confirm every posted bill has a job tag, confirm the WIP balance on your balance sheet matches the sum of your open jobs' WIP Summary, and spot-check a handful of recent invoices to confirm billable costs actually made it onto them. Separate job cost accounts from your general operating accounts if you haven't already. It makes this monthly check considerably faster because you're not sorting job-related transactions out of a mixed general ledger every time.
How Do You Sync Time Tracking and Payroll With QuickBooks?
Most job costing breakdowns trace back to the gap between where crews log time and where QuickBooks expects to find it. If your field crew uses one app and your office runs payroll through another, hours can get lost, duplicated, or misassigned in the handoff.
QuickBooks Time integrates natively if you're already in the QuickBooks ecosystem, syncing job codes directly so approved hours flow into job costing reports without a manual re-entry step. If you're using a third-party time-tracking tool instead, confirm it maps to the same job or Customer:Job naming convention you use in QuickBooks. A mismatch in naming, "Job 118" in one system and "24-118 Meridian" in QuickBooks, is enough to break the sync and leave hours sitting unassigned.
Set a weekly reconciliation habit: pull the Time by Job report from QuickBooks and cross-check it against your time-tracking platform's job summary. Any variance usually points to a foreman who didn't clock the crew into the right job code, or a sync error that needs a manual fix before payroll runs. Fix it before payroll posts, not after, since correcting job costs after payroll has already hit the books means reclassifying journal entries, which is more work than catching it upfront. A tool like CrewTrack can help capture field time against the right job code from the start, which reduces how often this reconciliation turns up a mismatch.
What I Learned Fixing a Bad Estimate
A framing sub I worked with had priced a job using a materials markup that hadn't been updated in two years. QuickBooks showed the job "profitable" for six weeks because nobody had entered a real estimate to compare against. Once we built the estimate and turned on weekly Estimates vs. Actuals review, the true margin showed up as negative within days, not at closeout. That's the whole point of the discipline.
— Dave
Where Subascent Fits Alongside QuickBooks
QuickBooks handles the accounting side of job costing well once it's set up right, but it was never built to capture bid deadlines, run PDF takeoffs, or get a foreman's daily hours off a clipboard and into a job code. That's the gap Subascent fills for specialty trade subs.
Subascent tracks incoming bid invitations, runs takeoff directly from PDF plans, manages submittals and change orders with GCs, and captures crew time through the free CrewTrack mobile app, then syncs cleanly with QuickBooks so the job costing work covered here actually has clean, timely data behind it. For an estimator drowning in spreadsheets or a PM chasing foremen for timecards on a Friday afternoon, that sync alone saves hours every week. If your job costing setup for small trade firms needs a companion tool rather than a bigger accounting overhaul, see how Subascent works and start a free trial to see how bid tracking and QuickBooks sync fit into your current workflow.
Where to Verify These Setup Steps
For the exact click-by-click setup, QuickBooks' own documentation covers each step in this guide directly:
- Track job costs in QuickBooks Desktop walks through Customer:Job setup and reporting.
- Track project costs by cost group covers Advanced's grouping feature.
- Spreadsheet Sync troubleshooting explains admin controls and common validation errors.
Sources
- Track job costs in QuickBooks Desktop
- Track project costs by cost group
- Spreadsheet Sync troubleshooting and admin notes